Tag Archives: home

Insulate Your House for Winter

insulation

Winter cold is always harsh, but what if your house isn’t insulated correctly? That could mean big problems for you and your family.

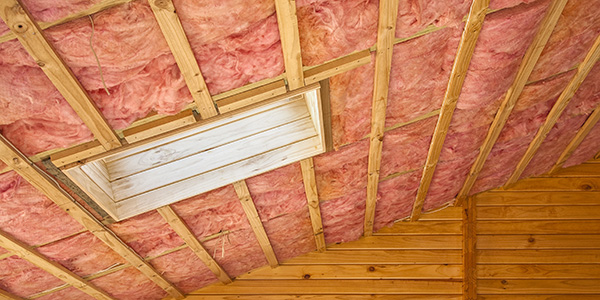
Before the harshest part of winter arrives, you may need to consider reinsulating your home. Over half of a home’s heat can escape if it’s not insulated correctly, which wont just keep your family cold all winter, it will cost you hundreds of dollars per month, too.

Most houses, except those made for energy efficiency, can benefit from new or additional insulation. To find out how much insulation you have, how effective it is, and where the insulation is located, you can get a home energy assessment by a qualified home energy auditor. These professionals will also tell you which areas of your home are not air-sealed, so that you can prevent even further heat and energy loss.

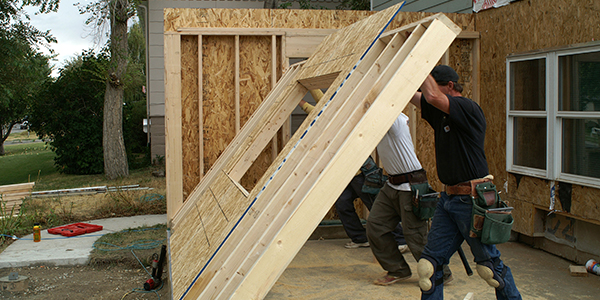
After your home has been assessed, it’s time to add insulation to your home! If you need to first remove old insulation that is destroyed, moldy, or wet, be sure and use an insulation removal vacuum before installing new insulation. After old, unusable insulation has been removed, it’s time to install the new insulation! An insulation blower is going to provide more coverage than using rolled sheets of insulation. Insulation blowing also has the ability to cover difficult or unusual areas of your home, for a more thorough and effective seal. Insulation blowers allow you to also pick which kind of insulation you wish to use, such as standard fiberglass, stone wool, or cellulose. This allows you to select the insulation that is right for your needs, while also saving your family hundreds on electric and heating costs.

For all your insulation and removal needs, Action Rentals has what you need! Renting insulation equipment from the professionals at Action will save you even more time and money on your big project!

Adding an Addition to Your Home

addition

There are many different ways to expand your home. Additions can come in all shapes, sizes, and designs, and offer unique opportunities to the homeowners. Additions, for instance, may allow you to change the look of your home, or to create a new statement for your home, without having to redo the entire exterior space.

While the most common addition to a house attaches to the rear, there are more creative ways to complete a needed addition. If you do want to add to the back of the house, however, you can always use a material that matches the roof or shutter colors instead of your main exterior material. By using materials different than that of the brick or other products that may match the current exterior material more exactly, you will bring more interest to your home’s exterior.

Another good idea to consider for home expansion is to add your addition upward instead of outward! If your current housing structure will allow it, look into having your addition placed on another level, instead of simply expanding the first floor of your home. Not only will this option create a larger-looking home, but it may also be more cost effective by saving you money on the expansion of your home’s foundation.

Finally, when adding any addition to your home, there are a few things to keep in mind to ensure the project adds to the value of your home. When expanding your home be sure to not create an addition that overpowers the rest of your home or looks out of place, you don’twant your home to be overwhelmed by an addition! Any addition you put on your home should connect well with the landscape around it, for example, don’t add an addition and forget to bring the flowers/ shrubs that already fill your property out to match the new addition. Before beginning work on your home, especially if completing the job yourself, ask an architect or contractor their opinion on your expansion plans, their advice can be invaluable forbig projects such as these!

After you have decided what kind of addition you will do on your home, be sure to come see the experts at Action Rentals and rent all the contractor and building equipment you’ll need for the job!


Winterize Your Home!

Fall is the perfect time of year to winterize your home, or perform maintenance that will keep your home in the best shape to get through the colder winter months and save on heating costs. Here are some helpful tips.

Starting on the outside, check the condition of your roof, gutters and downspouts. Clean out the gutters and install leaf guards if not already in place. Use a hose to spray water into the downspouts to remove any debris. Check the flashing and replace any loose or worn shingles or tiles to insure water cannot enter your house. If you have fireplaces, be sure to cap or screen the top of the chimneys to keep animals out. Hire a chimney sweep to remove soot and creosote from the chimneys. Inspect the dampers for proper opening and closing. And, don’t forget to stock up on firewood!

Next, inspect your foundation and seal up any cracks or holes. Secure crawlspace entrances. Clear all leaves and debris away from the foundation. Insulate any exposed plumbing pipes to prevent freezing. Check all exterior doors and windows for tight seals. Seal/caulk any cracks and replace any cracked or broken window glass. Switch out summer screens with the glass replacements. If you have older model windows, consider covering them with plastic to keep warm air inside and cold air out. Install weather stripping around doors to prevent cold air from entering your home. If you have ceiling fans in your home, now is the time to change the rotation direction: counter-clockwise rotation produces cooling breezes and clockwise rotation produces warmer air.

Finally, if you have central heat and air, get your furnace and ducts inspected and cleaned by an HVAC professional. Remove any flammable materials from the area surrounding your furnace. Be sure to change your furnace filters each month. Purchase smoke and carbon monoxide detector batteries and change them out when daylight savings time ends on November 1. If you don’t have these detectors, purchase, install and test them to assure your family’s safety during the coming colder months.

For more tips on how to winterize your home, come by and see our experts at Action Rental and Sales at 1861 N. Eastman Road in Kingsport, TN, call us at 423-246-5181, or check us out online at actionrentalkpt.com.

Build a Deck!

It’s almost summertime, which means more evenings will be spent taking in those mild summer nights. Enjoy those evenings on a brand-new deck…and what’s more, build that brand-new deck yourself with the help of equipment rentals from Action Rentals!

Give your backyard a makeover. Create an “outdoor room” that is a great place for entertaining friends or letting your toddlers play.

Not only do you need to select the structural materials, and the decking type, there are post options and caps that can add elegance and personalize your deck.

deck_53441800

Follow these tips to ensure the smoothest building process:

  1. Foundations needs to be deeper the higher the deck is off the ground.
  2. For ground-level decking, go below the frost line.
  3. Post holes should be at least 24 inches deep. (Don’t forget the post-hole digger).
  4. Deck shape can be easily adjusted to any requirement with minimal woodworking skills.
  5. Decking boards can be straight, run diagonally, or you can create more complex chevron or square designs.
  6. Trim edges with a power saw or jig saw to create curves. You may need to use double joists to enable you to fix more complex designs.
  7. Newel posts need to be at least 36 inches high and support the balustrade at least every 6 feet. Railings are mandatory if the deck is over 20 inches off the ground.
  8. The frame for raised decking is constructed from pressure-treated lumber.
  9. On a concrete base, posts can be adhered to the ground using bolt-down post brackets.
  10. Safety first! A raised deck requires a handrail.

For help with this and any other DIY project, come see the experts at Action Rental & Sales in Kingsport, Tennessee. We have the tools and expertise to help you finish your “To-Do” List. Stop by our showroom at 1861 Eastman Road, visit our website or call us at 423-246-5181 for a complete listing of products and pricing.

Project Safety and You!

Whether you are at home or on a job site, safety is of utmost importance! The entire Action Rentals team takes safety seriously and we encourage our clients to as well. Here are some handy tips to help you stay safe during your projects!

Project-Safety

–     If your project involves using chemicals, make sure to read the labels and FOLLOW all manufacturer instructions and warning labels.

–     Before you dig, call the local utilities to make sure that you will not be digging where you could get hurt.

–     Protect your vision! Safety glasses or dust glasses will help protect against flying particles and chemical goggles will protect against exposure to fertilizers and pesticides

–     Be observant. Be aware of anything that could harm you or your family (power lines, water lines, trees, etc).

–     Check your lawn for any debris prior to mowing.

–     Ensure that any tools you keep at home are in good working condition. Damaged tools should be repaired or replaced. If it is a tool that you don’t use frequently, check and see if we carry it and that way you will know it is always in good condition.

–     In any project, use common sense. If something feels dangerous or potentially harmful, then it probably is.

We are more than happy to provide any knowledge or experience we have to make sure that your project is done with a minimum of hassle and a maximum amount of safety! We look forward to helping you with your next home or business project! Check out our website or call us at 423-246-5181

DIY – How to Install A Ceramic Tile Floor

TILES_44589280

If you are like many, this New Year has brought you a new list of “To-Do” items. If installing a ceramic tile floor is one of those “To-Do’s” here is a list of instructions on how to do it! At Action Rental & Sales Equipment Division, we have the tools you need to turn your next “To-Do” item into a “Done” item!

Step 1: Before you begin, get a general sense of how level the floor is. If you see any deep holes or dents, it might be necessary to prepare some quick-drying, self-leveling cement from a hardware store. Pour the cement mixture into any deep trenches and let it sit for at least 24 hours.

Step 2: Once the floor is level, chip away any old mortar and then thoroughly clean the surface. To make sure the surface is truly clean, you will probably need to do this more than once. Remember, the less dirt on the floor, the easier it will be for the cement to form a strong seal between the tile and ground. Next, remove any trim or other fixtures around the wall at floor level. Make sure to check and see if you have enough clearance by stacking two tiles on top of each other near any doors.

Step 3: Now that the surface is clean, lay out and diagram exactly how you want the tile to be placed. Measure the dimensions of the room, and pick a spot in the center to start. Use blue chalk to mark a cross pattern into the floor. Work your way out from the center. This will save you time so that you are using mostly whole tiles and only have to cut the ones that will be placed along the wall edges.

Step 4: You will want to get the mortar to a peanut-butter like consistency. You can do this by adding water. Helpful Hint – prepare small batches as you go as the mixture hardens as time passes. An easy way to do this is by attaching a paint-mixing bit to an electric drill. Use a notched floor trowel to scoop out a glob and spread it evenly across the floor using the flat side. You don’t need a lot but enough to evenly coat the floor. Once the area is covered, flip the trowel and use the grooved side to spread it at a 45-degree angle.

Step 5: Spread tile adhesive on the back-side of the tile in a fairly thin layer. This application, along with the trenches on the floor, will ensure a permanent and strong bond between tile and ground. Gently place (do not slide) the tiles. Use spacers to maintain constant grout lines if you prefer, but it is also fine just to eyeball it. Repeat until all whole tiles have been placed. Once you hit a wall or a space that requires a cut tile, simply measure out the dimensions and use a tile cutter to form the proper shape.

Step 6: Once the floor is completely covered, mix the grout to a frozen-yogurt-type consistency, keeping in mind that small amounts go a long way. You want the grout to fall into the spaces you’ve left between the tiles yet, still be easy to spread. Next, place some of the grout on the tiles and use a grout float to spread it evenly around. Make sure there aren’t gaps or bubbles. Scrape off any excess by wiping diagonally across the tiles. Follow the scraping with a wet sponge. Helpful Hint – Have a bucket filled with water on hand to wash out the excess. It will take a few passes with a sponge to remove the entire residue from the tile surfaces. Let tiles stand for 24 hours.

For help with this and any other DIY project, come see the experts at Action Rental & Sales in Kingsport, Tennessee. We have the tools and expertise to help you finish your “To-Do” List. Stop by our showroom at 1861 Eastman Road, visit our website  or call us at 423-246-5181 for a complete listing of products and pricing.


How to Winterize your House

Although it might not feel cold outside, now is the perfect time to start preparing their home for winter, a.k.a. winterizing. As the temperature drops, it won’t be as easy to get out and do the projects needed to help keep your home in great shape through the colder months.

Website 2

1. De-clutter gutters

Even if you don’t have trees close to your home, rain gutters are still able to collect debris and should be cleaned out before winter. By keeping gutters clean, you are helping prevent ice from building up which can cause gutters to come loose or damage to the roof. While you are cleaning the gutters, make sure to check for loose joints or any other structural problems.

2. Say No to drafts

An easy way to help winterize your home (and help with the power bill) is to find and stop drafts in your home. Start with your attic areas and access panels followed by the basement and then windows and doors. Once you find any areas that are letting air in or out, you can seal them with a good quality insulation, caulk, weather stripping or window film. One helpful hint, when caulking, make sure to remove the old caulk first.

3. Seal the drive

Snow, ice, salt and shovels can really take a toll on your driveway. If you have it sealcoated every three years, that will help to prevent costly repairs or replacement down the road. In addition to not only looking nicer and protecting the asphalt, the darker color will also help to melt snow more quickly in the winter.

4. Trim the trees

Winter weather can mean ice, snow, cold windy days and more. All of these contribute to breaking limbs off of trees and potentially causing home and property damage. First start looking for obvious problems, such as limbs hanging over wires, the driveway and most importantly the house.

5. Chimney check

Thinking about having the fireplace cleaned and serviced when you are still using your air conditioner is tough, but it is one of the most important winterizing projects possible. By keeping your fireplace cleaned and properly maintained you not only increase its heating efficiency, but you also ensure your family’s safety during the winter months.

For more winterizing tips, come see the experts at Action Rental & Sales in Kingsport, Tennessee. Stop by our showroom at 1861 Eastman Road, visit our website or call us at 423-246-5181.